Making the Basic Bead Bars
I know it's been a long time coming, but it's finally here! Details, with photos, of how to make the bead material. We'll start with the most basic: the bead bars. You will need to make 55 each of the bead bars 1-10. I'm using the "fives" as my examples because they're not too big and time-consuming to make, but they're are large enough to show some of the more complicated aspects of bead material making.

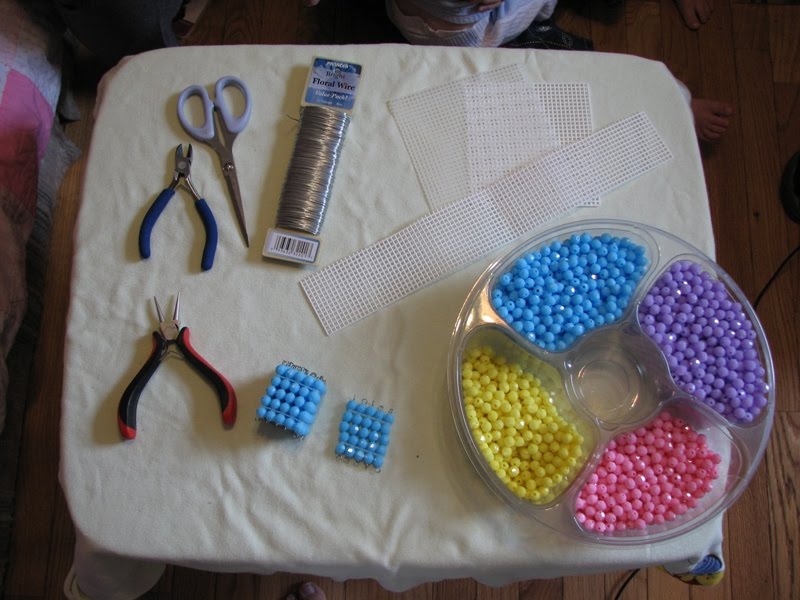
Step 1: Gather your materials. It's best to have your beads organised and your wire cutters, wire, round-nose pliers, and plastic canvas all in one place. That way, when you have a moment you can grab the supplies and work or you can pile them quickly in a bag to take with you. I found the car is a wonderful place to work on making bead material. Please keep in mind, though, if you decide to work in a vehicle, you should not be the person behind the wheel!

Step 2: Cut your wire. You'd think this would be the simplest part, but you'd be wrong. Not that the cutting is particularly difficult, but the judging of the right length is! There are two ways to go about this, the stupid way and the smart way. I did it the stupid way for most of my bead bars, but when making the bead chains I figured out the smart way and I've been using it ever since. The stupid way is quite simple. You unwind approximately as much wire as you think you'd need to make the bead bar, plus some length for the two loops, plus a little bit extra. To make things go faster, you'd cut a bunch of wires at once. The problem with this method is twofold: first, it's remarkable how badly one is able to judge the appropriate length, you always end up with several that are way to short or way too long; second, as a result of poor judgement, you find yourself wasting wire, it doesn't seem like much, but many little bits add up. The smart way to go about cutting the wire (and I highly recommend you do this, rather than my first method!) is to unroll yourself a long piece; how long depends on how much space you have and how high you are. Because you need the beads to go run down the wire as you string them lengths of wire that spool on the floor become awkward. So, while in the photos you will see me making a single bead bar on a short length of wire, it is best if you start out with something like this:


Step 3: Make a wire curl. The small metal loop at the end of each bead bar is what keeps the beads from sliding off and it keep little fingers from being pierced by sharp, metal points. The size of the curl results according to how high in your round-nose pliers you grip the end of the wire. It will take quite a few tries to get used to getting the size loop you desire. If you're a perfectionist you might want to practice first. I just hopped in and figured that it was good enough. If they were really way too big or small, I'd do my best to fix it and in a few very funny-looking cases I tossed the wire and began again.


Step 4: Straighten the wire. Once you've got the wire curl finished you will need to grasp the wire in one hand and use your round-nose pliers to put a twist in the wire where it meets the loop. Essentially, you are trying to make the loop meet the straight section like a lollipop (O---) rather than like a number 9 (O___), as is seen below:


Step 5: Thread the beads. If you are doing individual bead bars, then you would add the number of beads needed, in my example, five light blue beads. If you are making many bead bars and are using the long-wire method, then you keep adding beads until your wire is about 3/4 filled and then make another wire curl at the other end. If you get too many or too few beads it is quickly and easily fixed, so don't put too much thought into getting it just right. You will then need to slide the correct number of beads to this end.

Step 6: Twist the loose end. Putting the tip of your round-nose pliers as close as possible to the last bead, you will then twist the wire to at least a right angle relational to the bead bar. This will keep your beads in place.

Step 7: Clip off the excess. This is the next-hardest part of making a bead bar because it involves another bit of visual judgement. You have to use your wire-cutters to make a length of wire from that last bead which can be turned into a nicely-sized curl: too big and it will not look right, too little and your beads might come off. Doing this correctly takes some practice. It is difficult to tell in the photograph exactly how much wire I'm leaving. If you are doing individual bead bars, if you had cut the perfect length of wire at the outset (and it does sometimes happen) you may not need to trim the wire at all! If you are doing a length of wired beads, however, you will not be able to skip this step, indeed, you will have to add a little bit to it. After cutting the wire make sure you put another wire curl on the end of your long bead string or else you may find yourself picking up dozens of beads that slid off the wire when you were distracted by making the wire curl at the end of your new bead bar!

Step 8: Make a tight wire curl at the angled end of the bead bar. When I say "tight" I don't mean "small." The loop cannot be too small because if it gets at all squished the beads can come off right over it. However, the loop must pull tightly enough so that the beads are not loose. Loose beads on a bead bar means the bead bar can bend more easily and you'll find yourself spending a lot of time straightening them!
.jpg)
And VOILA! You've got a bead bar! Next up: How to make a bead square!
Labels: bead bars, mathematics; bead material; making bead material; math




.jpg)

