Friday, March 18, 2011

Zoology & Taxonomy

Ah, science.  Of all subjects it was my weakest in high school: chemistry specifically.  I did alright in biology, mostly because my best friend and I were in the same class and studies together.  If you listened closely during tests and exams you might have heard us humming softly.  We found that the best way to remember the facts was to make up silly songs.  If only I had begun learning science the Montessori way!  Here is a sample lesson, one that can be repeated indefinitely without growing tedious.

Above you can see the (almost) completed lesson in zoology/taxonomy.    I use it as a launching board to talk about all different kinds of plants and animals, but mostly animals.  We begin with the most basic of categories: living and non-living.  Ella sets out two pieces of paper, one labeled "Living" and one labeled "Non-Living."


I've made up many cards (just using Microsoft Word, eight cards to an 8 1/2 x 11 page), the vast majority of them animals, for Ella to sort.  I've mixed them all up and divided them into small groups so she can grab a pile and sort through those that day.


Choosing items for non-living was very interesting.  Most things I chose were no-brainers, i.e. they are obviously non-living, but there were a few that were more challenging.  Fire is an excellent one as it has many characteristics of living things (can grow, can move, needs air, needs "food", leaves waste, etc.) and there are a few others that can catch one unawares.  Above you can see that included in this pile are lightening, stalactites, rocks, and a compact disc.  There was no doubt that the rocks and compact disc were non-living, but lightening has some similarities to living things as do stalactites.  It took quite a while for her to decide where to put the stalactites because in an earlier stack she had coral, which appears to be like a rock, but is actually living.  The sneaky ones are the most fun and they help reinforce the difference between the living and non-living.


I scoured the internet for the pictures I used for each card.  While I tried to focus on variety, keeping in mind that the majority of cards would have to be vertebrates, I did make an effort to put in plenty of animals that are native to our area, such as the ruffed grouse (bottom left), which is a popular game bird in New Brunswick.

After separating living from non-living we take our pile of living and divide them up between "Plants" and "Animals."  Yes, I know that there are more categories of living things than just those two, but as they are the most common and encompass almost every living thing with which a child is familiar we focus on them.  Fungus, protozoa, bacterium, etc. can come later.


 Most of this sorting Ella found very easy, but I tried to keep her on her toes.  The Venus flytrap, being carnivorous, gave her a moment's pause.  And she was convinced for a long time that coral must be a plant, which I grant you, is not an illogical conclusion!


This particular pile of cards only had three samples of plants.  Our discussion of the tree trunk was interesting as the tree itself was dead, and therefore neither living or non-living, but it was covered in moss (which was my target species) and the moss was clearly alive.  Ella decided that rather than having just two initial categories there should be three: living, non-living, and formerly-living/dead.  After all, wood was once a tree, and the radishes can't really be living if they've been pulled up out of the ground, chopped up, and pickled!  Smart girl.


After the plant/animal division, we take the animal cards and divide them between vertebrates and invertebrates.


Categorizing animals this way is a bit more challenging.  Because you can't actually see the backbone or spine in a vertebrate you have to think through how an animal moves, how it lives, and what its surface feels like.  Ella is just beginning to remember consistently to look for segmentation of the animals' bodies, hard exteriors such as shells (an exoskeleton), and over-all "smooshiness" (that the body is completely smooshy or soft, indicating that there are no bones).  


Again, putting in tricky cards gives the opportunity to discuss the "why is it this one and not that one?" question.  Above I included a sea horse.   Ella concluded initially that it was an invertebrate because it appears to have an exoskeleton, even though it is a fish, though like catfish sea horses do not have scales. 


Following the organization of the vertebrates and invertebrates we take the pile of vertebrates and then comes the real sorting fun!


With five categories to chose from there's a lot more room for error.  Each animal has to be evaluated in several different ways: what kind of "skin"  it has and/or if it has a skin covering (hair, fur, feathers), whether it gives birth to babies or lays eggs, if it lays eggs whether it lays them on land or in water, if the offspring look like miniatures of the parents or if they have another form entirely, if it has a mouth or a beak/bill, how it breathes, where it lives, if it is warm or cold blooded, and how it feeds its babies.  There are hosts of conversations to be had as we work through these cards, and I frequently find that Ella and I end up laughing, especially at odd animal behaviour or appearance.


Amphibians.  They have slimy skin, live in or near water, are cold-blooded, lay eggs in water, have babies that look nothing like themselves and whom they completely ignore, and usually can breathe right through their skin.  Their appearances have little variation: frogs and toads look similar as do salamanders and newts.  To give a bit more variety I've tried to include pictures of amphibians at various stages of development.


Mammals.* We are warm-blooded, have fur or hair, live all over,  breathe air with lungs, give birth to babies that look similar to the parents (usually!), and feed our offspring with milk from our own bodies.  Isn't it great to be a mammal?  There are quite a few unusual mammals, like whales, manatees, platypuses, etc.  It can be fun to emphasize the similarities between humans and other mammals, as well as the differences.  Thank God for opposable thumbs!  Plus, as a nursing Mum, it's interesting to discuss how other species nurse.  In the case of whales, Ella would not believe me that they were mammals until I found a video of a beluga whale giving birth and nursing her baby!


Fish.  They live in water, are cold-blooded, and breathe through gills.  Some species give birth to live young, but most lay eggs.  The level of parental involvement is usually low to nonexistent.  Although there are three different classes of fish, for the young child and early elementary student so many details can be confusing, so I lumped all the fish together.  When (or if) I ever have time to set up an aquarium again we will certainly get into closer examination of fish classes.


Birds.  Feathers, beaks, wings, and two legs are the most easily recognizable traits.  They are warm-blooded, breathe air with their lungs, lay eggs, and are frequently attentive parents.  One of their families (the penguins) are even able to survive in the harshest climate on earth and one of their species (emperor penguins) stay in that climate during its harshest season in order to go to extraordinary lengths for the purposes of mating, bearing, and raising offspring.  In my opinion, birds are way cool!
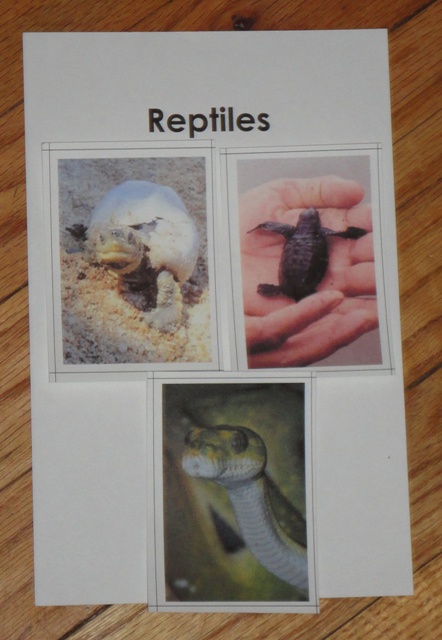

Reptiles.  Some like life where it's hot and dry and others would prefer to stay wet all day long.  But they all have scales, breathe with their lungs, are cold-blooded, lay eggs on land, and their babies look like miniature adults.  They are also very good for frightening grandmothers and mothers when brought in from outside with a cheerful, "Look what I found, Mum!"  (Please note: this refers to something my brother did to my mother and grandmother, not something my children did to me.  I would not be so chicken-hearted... I hope!)


After all the sorting has been done, we clip each section together with other cards of the same category, to play with and discuss later.


Eli added his own artistic touch to the non-living card!


And, as is so often the case with homeschooling Montessori Mums, how to store materials effeciently is of great concern, so here's what I did.  I found this tray and this box at the local Dollarama store.


The tray perfectly fits half of an 8 1/2 x 11 piece of paper (or cardstock), which is what I used for the category titles, and the small crate is perfect as a card holder!


*Please note:  While all the photographs taken above were mine, the pictures in the photographs are not.  They were all found online through Google search.  The human family in the mammals is unknown to me, but it was the best photo I could find of nude humans that was neither graphic (in the negative sense) nor of poor quality.  Since all the other animals were au naturel, I figured it was only fair that the humans were as well.  For the record, I think it is a beautiful and tasteful photo... though I don't think I'd be comfortable with my family posing in such a manner, or at least displaying it!

Labels: , , , , , , , , , ,

Saturday, March 05, 2011

Addition Table with the Bead Bars

Here is a super-simple presentation of an addition table from one to five.  It is mainly to work on memorization of basic addition, but it also shows the pattern of sums.


I printed a 6x6 grid (3x3 grids on four pieces of cardstock, cut and pasted together), though you could easily draw it out on bristol board.


We left the upper left square blank, representing zero.  Then we put in our addends: one through five across the top row and one through five down the first column. I got her started by going across the second row verbally: "One plus one is two."  (Then placing the green two bar in the square where the red ones meet.)  "One plus two is three."  (Place the pink three bar.)  "One plus three is four." (Place the yellow four bar.)  And so on.

Ella took over with the bead bars and when I came back I discovered that she had decided that because by six the bead bars were too long to go straight across the squares that she could bend them so they would fit in nicely!  She doesn't do that anymore.  I showed her (as you can see with the sixes and sevens) that they would fit if put diagonally.

This lesson can easily be expanded to 10 + 10 by expanding the grid.  And let me emphasis the importance of saying aloud each equation.  Ella cannot understand why I insist on this, but it does help with memorization and (very important for busy mums) you can hear what your child is doing while doing housework/writing papers/changing diapers/folding laundry or whatever else needs doing!

Labels: , , , , , ,

Friday, March 04, 2011

Working with Words and the 3-Period-Lesson

Besides doing Montessori I'm also using a few workbooks with Ella which are grade-specific.  Usually she enjoys doing them and it means that I can compare what she is able to do with what the public curriculum expects.
What she is learning in Montessori I supplement with the workbooks and what she is learning in the workbooks I supplement with Montessori.  Here is an example of the latter.

The workbooks have been going over nouns and verbs.  I have not yet got the material for grammar through Montessori (though I plan to), but I did make up a couple hundred word cards that she could use to make sentences.


I used cardstock in three colours.  The nouns are on red paper, the verbs are on yellow, and what we are currently calling "helping words" are on blue.  I have told her that there are a lot of different kinds of "helping words" and they have names, just like verbs and nouns do, but for right now we're just focusing on the verbs and the nouns.

To present the material I began laying out all the nouns that were the names of places.  I asked her to explain what was the same about these words.  Didn't take her long.  Then I began to lay out nouns that referred to people or were people's names and asked her to say what she thought they had in common.  Finally I laid out all of the words that identified objects and again got her to point out what was similar about them all.

"All of these words are called nouns," I explained.  "Nouns name either a person, a place, or an object."

We repeated the lesson with verbs and talked about how verbs were an action or what someone or something is.

Then we began to make sentences.  Very soon she knew how to use the cards and made longer and longer sentences, sometimes making them rather complex.

Although I had made all the verbs to be present, third person, singular she found that too confining and began to use the word that came after a verb to cover up the superfluous "s."

During our second lesson using the word cards Ella learned the difference between subject and object.  For this I used the 3-period-lesson.  If you're not familiar with the 3-period-lesson here it is in simple form:

First Period: Tell the child what he or she is touching/experiencing.  E.g. This is the subject.  In a sentence the subject is what does the action.  This is the object.  In a sentence the object is what receives the action done by the subject.  The key to the first period is keeping it simple and to-the-point.  With a younger child, such as my sons, I would endeavour to use as few words as possible and keep the emphasis on the word I am trying to get them to learn.  So, when I am presenting the colour red from the first set of colour tablets, I lay the tablet on the table in front of the boy I'm working with and say, "This is redRed."

Second Period: Get the child to indicate the correct object when you ask.  E.g.  Where is the subject?  Show me the object.  With my boys I'd ask, "Where is red?"  or "Which is red?" (if I had already presented more than one colour.  If the child has difficulty then you go back and repeat the first period lesson again.

Third Period:  For this you want the child to do the explaining and to use the correct vocabulary without prompting.  E.g.  I would point to the subject and ask "What is this?" or "What part of the sentence is this?"  Then Ella would answer "It's the subject.  The subject is what's doing the action."  With the very young you are simply trying to teach them to identify, they can learn to explain later.  So I would ask, "What is this?" or "What colour is this?"  Henry is my talker and he will usually answer verbally, "Wed!"  Or, sometimes, "'Ellow!" and then I have to correct him.  Eli may or may not answer and after giving him a chance I will give him the answer, "It's red!"

Labels: , , , , , ,

Wednesday, March 02, 2011

Square of Pythagoras - Some Extentions

Yet again we used the square of Pythagoras, although this time we worked together at arranging it, Ella dividing up the pieces between us, although she always kept the squares.  "After all, I'm the student!" she explained.

Ella and I have made the square of Pythagoras.  Then I directed her to build the tower with the pink cubes.

Without any prompting on my part she took the smallest square and put it on the smallest cube of her tower and said, "Look Mummy!  They go together!"

We then "related" the pink cubes with the square of Pythagoras.  I asked how she knew where each would go and she explained that each side of a cube was a square and that therefore the pink cubes would go on the actual squares in the square of Pythagoras.


Ella then proceeded to relate the two materials in the same way as she had done with the red square and the smallest pink cube.

Then she did it horizontally.


After we had put away the pink tower and reorganized our square of Pythagoras I got out the bead square for her to relate them together.  She told me that it was pretty easy since they all matched in colour.

Here she is almost done.  I then extended the lesson a little by giving her an early glimpse into multiplication; though we are not yet "naming" it as such as I would like her to absorb the ideas sensorially first.  I would touch each bead square, while it was superimposed on the square of Pythagoras and say, "One one is one.  Two twos are four.  Three threes are nine," and so on.  After each statement I would pause for her to touch the square and repeat what I just said.  I expect this activity will continue in a variety of ways until we are actually doing "real" multiplication.

Our "fancy" storage container for the square of Pythagoras - a plain wood tray from the dollar store.

Labels: , , , , , , , ,

Tuesday, March 01, 2011

Square of Pythagoras - First Presentation


Thanks to all who inquired.  No, I'm not dead!  It's been almost a year and a half since my last post, and while my life has been moving quickly onward I've been facing it mostly with glazed eyes and an air of confusion.  Such is life with twin boys.

My sons are now 2 and are healthy, mischievous little fellows.  I've begun to do some early Montessori work with them, which you will hear about in an upcoming post.

Ella is now "officially" grade 1, in that she is 6 and that is the typical grade 1 age.  And there ends all that is "typical" about her.

Evidently she's doing some things on a grade 4 level, and she was teaching our 17 year old babysitter about geography.  Her reading is about average, or perhaps a bit above average for her age, and her handwriting in abominable!  Though much of what she writes looks like the hen-scratchings of a preschooler, what she writes is very well done.  I guess we just didn't do enough of the sandpaper letters or the metal insets.

I have a vast backlog of photos and lessons to share and I hope to do so over time.  For today, here was our afternoon lesson: the first presentation of the square of Pythagoras (also called the deconomial square).


The square of Pythagoras is basically the multiplication times table in visual form.  The smallest square is 1x1 cm and is red in colour, which coordinates with the colour of the bead bars.

The next three shapes are green, like the "2" beads and are 2x1 cm, 2x1 cm, and 2x2 cm square.

The next five shapes are pink, representing "3" and are (2) 3x1 cm, (2) 3x2 cm, and a 3x3 cm square.

In the above photograph, Ella is laying out the 4s.


I find that she really enjoys making the square of Pythagoras as she thinks that the pattern is beautiful.  I think so too.


The completed square (as done by Ella).  As you can see it goes from 1x1 cm to 10x10 cm.  It is meant to coordinate with the pink cubes, the brown/broad stair/rectangular prisms, and ultimately can be used as a guide to laying out the bead bars in the deconomial.  Hopefully I will be showing these extensions in the near future.

As for the Square of Pythagoras material itself.  It is really hard to find to purchase. Ideally it is supposed to be made out of wood, but I found it much easier to make it out of foam sheets using a large paper-cutter.  (An office-sized paper cutter can be invaluable when making materials.)  I've also seen beautiful square of Pythagoras lay-outs made of felt or other fabrics, plastic duo-tang covers (though I don't know how easy or difficult it would be to find the colours you want), and painted cardboard or bristol board (though they can tend to warp).

Initially I planned on making it using inches as a base, rather than centimetres.  Bad idea!  It was HUGE and very unweieldy.  I'm very glad I downsized, though what I'm going to do with all that extra foam is beyond me!

The first presentation of the square of Pythagoras is not meant to teach the multiplication table, but like the binomial and trinomial cubes it is a sensorial introduction to a more complicated mathematical concept.  Right now we call all the green rectangles and square the "twos,"  all the pink the "threes" and all the yellow the "fours."  It will be some time before we begin to name individual rectangles 2x1 or 4x3.

To present it I simply named the material, "This is the square of Pythagoras." and I began making the square, beginning with the red, then the green, then pink, and so on.  It didn't take long before Ella got the idea and just took over.

She was rather frustrated by the fact that her square of Pythagoras wasn't as "perfect" as mine, but with a bit of reassurance that it took practice she became satisfied with her results.  I'm looking forward to her reaction to the extentions.

Labels: , , , , , , , , , ,

Saturday, June 21, 2008

Field Trips - Learning by Experience (PLUS - CONTEST - see rules at the end)

Preview for the next post: Ella and I hiking during our most recent field trip:


One of the advantages of homeschooling is that not everyday has to be a "classroom" day. Because you only have X-number of children to deal with (in my case, an easy "1"), provided you have a vehicle that can carry you and all your gang around, field trips are limited only by your imagination and your budget!

Montessori is all about learning through experience, not (as is the common way) learning through lectures/teaching/observing. Let's consider these over-used methods.

Lectures
Almost any university or college uses this method either primarily or (in some cases) almost exclusively. This method can work extremely well or terribly poorly; it all depends on who is lecturing, and who is listening. Lectures work very well for me. I'm an aural learner (one who learns well by hearing). But, for visual or kinesthetic learners (those who learn by observing or those who learn by moving/motion), a lecture-only environment is useless.

Teaching
The difference between lecturing and teaching is a fine line, and one that often blurs. Where as a lecturer talks about a subject, a teacher tries constantly to engage the students, watching for response, inviting discussion, and trying always to bring about understanding in the minds of the students. Many teachers can lecture very well, but a lecturer is not necessarily a very good teacher.

Observation
This is the most common addition to any teaching or lecturing. Aural learners are simply not as common, despite it being the most frequent method of teaching, and so teachers add something (sometimes that can mean "anything" - however far they have to stretch it) for students to look at. Usually this involves a hand-out, picture, diagram, chart, object, etc.

But, despite most educational institutions depending on the aural method of teaching, almost every child ends up spending much more time being taught through observation, and the medium is probably sitting in your living room. Don't get me wrong, there are plenty of excellent, educational programs out there, but ultimately your child is not experiencing anything! He or she is observing others experiencing something. Do you see the difference?

There are a lot of activities and places that you and your child will never get to experience, and for those things you can teach about it, read about it, imagine/role play it, or observe it. But there is also innumerable activities and places that you and your child can experience, and whenever you think of one of those, write it down and try to work it in as a field trip as soon as you think your child is ready.

Field Trip
In the past, we've taken Ella on field trips to the zoo, the aquarium, the museum, and (of course) multiple field trips to the library. We've gone hiking and talked about identifying trees (she's got cedar and birch down pat - easy to recognise their barks). We've looked at commemorative statues in the park, differing kinds of ships in the harbour, and how to follow a map when hiking in the woods or when walking around a city. All these things, regardless of whether they're typically taught in the public school system, are part of education, or should be.

But there's no control of error if you're doing them in the classroom. In the classroom you can look at videos or pictures of animals, either aquatic or terrestrial - but you can't experience them. In the classroom you can talk about history and look at pictures of the way things were, but you can't walk through and touch real models, and in some cases learn to do the things people did "back then." In the classroom you might be able to have a section of a tree to "experience," a small log showing its bark and a leaf perhaps, but it cannot compare to identifying a tree in it's natural environment. In the classroom you can study maps and write down directions, but you can't follow the maps and discover if you've arrived at the location that was your goal.

Because of the vast difference in observing or talking about something with actually experiencing it, field trips almost always trump classroom time. Please note: there are some areas in which field trips have limited use, namely mathematics, phonetics/reading, chemistry, etc. Often these subjects can be integrated with everyday life. Math can come in handy while shopping, phonetics/reading while you're driving down the road looking at signs, chemistry while baking, and anything else you can come up with using a little bit of ingenuity!

I began this post as an introduction to a post on our most recent field trip, but since it got so long, I'll leave it as a teaser for my next post: Our Super-sized Field Trip.


Can anyone guess where our field trip took us? If you are the first to post a comment and guess correctly you'll get a prize: a relevant postcard will be sent to you of this year's Super-sized field trip.

Don't leave your address in the comment, just your guess - whoever wins will be announced in my next post which will happen on Friday (if all goes as planned). At that time, the winner may submit another comment on the post titled "Our Super-sized Field Trip" that includes your mailing information and e-mail address. I will "reject" the comment, because I'm sure you don't want such information visible for all the world to see.

This contest is open to anyone who lives on planet Earth who does not know me personally. (Sorry to all those who do know me personally - but chances are you already know the answer, and so are disqualified!)

Labels: , , , , , , , , ,

Tuesday, May 13, 2008

My Completed Pink Tower

Okay, after sanding and sanding and sanding and sanding, going to Dad's to use his belt sander, then went home and sanded some more. In the midst of all that sanding I was repeated told by Dad, "Don't be so picky!" Can you guess which of the two of us is the perfectionist?

(If you happen to be looking for instructions on how to make the pink tower or broad/brown stair, go to Make Your Own Sensorial Materials, Part One and Part Two.

I gave all the blocks a coat of latex primer, then did multiple layers of "cherry blossom pink" acrylic paint. Finally, I gave them all three coats of acrylic varnish. Here's the results:


You can see more detail when I do the pink tower shell-shape:


From a distance, they don't look too bad. But if you take a closer look, you can tell that they weren't professionally made:

On the 10cm x 10cm x 10cm block, you can see the "dip" in the wood. If I had sanded much more, it would not longer have been 10cm x 10cm x 10cm, so I cut my losses and voila!

Here's another view of the 10cm x 10cm x 10cm block. You can tell here that one of the corners isn't really a corner. That was another fault in the log. Also (but not shown) is a large knot in the wood that, despite substantial wood fill and sanding, still has enough of an indentation to make it noticeable.

Just for comparison, I put the teeny-tiny 1cm x 1cm x 1cm block atop the 10cm x 10cm x 10cm block. Theoretically, it would take 1000 of the former to make the latter, and when you look at it this way, you can really see that.

Ella can do the pink stair with little-to-no difficulty, although sometimes it's hard to tell, as she often has a "friend" (be it little monster, Mayas the rabbit, Lambie, or some imaginary person) who just can't figure it out on his/her own, so mistakes are made which Ella has to correct! It's not always clear to me if she's making the mistakes deliberately in order to get to "correct" her friend, or if it happened by accident and she's just using her imaginary friend/stuffed animal as a scapegoat for her mistakes. In some cases, I can tell one way or the other, but sometimes... Well, let's just say I know her better than anyone, but there's plenty of times when I have no clue what's going through that little mind of hers!

Labels: , , , , , ,

Thursday, May 08, 2008

DON'T Make Your Own Sensorial Materials - Part 1 - Knobbed Cylinders

To Make or Not to Make - That was the question!
I cannot begin to tell you how many times my father and I talked about, measured, planned, and tried to figure out a way to make the Knobbed Cylinders! We have wracked our brains (or, more precisely, I have wracked my brain), and though initially Dad said (after I told him the price of the knobbed cylinders), "Of course we can make them! You aren't paying XX.XX dollars for four blocks of wood with little round things in them!"

But when faced with reality: meaning of course, after I had measured the sizes of all the cylinders, both width and depth, in imperial because naturally none of his drill bits would be metric, he said, "You need them to be that precise?" *scratches head while wrinkling brow* "Uh, I don't know about that." Eventually he caved an said, "Yes, order them, I can't make them!"

So here they are! (At least, half of them - I've only put out the first two as Ella isn't ready to add the third or fourth yet.) I took them up to Mum and Dad's after they arrived to show him, at which point he informed me, "Yeh, we couldn't have made those. At least, we couldn't have made them anywhere close to accurately, and they wouldn't have looked very good, either!"

Now you can all laud me for my grace and patience as, during the course of all this, I never even tried to strangle him for insisting initially that he could make them, and that I shouldn't waste my money, resulting in me actually ordering and receiving them long after I would have otherwise!

If you happen to live in an area where getting drill bits sized in metric is easily possible, then I would definitely recommend finding a friend/neighbour/acquaintance who has a drill press and make your own. But, if you have difficulties finding dowels in appropriate sizes, you might want to consider buying the knobless cylinders (also known as the coloured cylinders) sanding them with a very fine grit sandpaper, and then painting them brown. Then attach knobs with carpenter's glue. I found nice little knobs at a local hardware store. They weren't made to be knobs, rather they were actually little wooden knob-like hole covers that I found in the craft section. But - whatever works!

Why I Decided to Get Them in the First Place
When first trying to decide which materials I should make, which I should buy, and which I could skip altogether, the knobbed cylinders were the first to be scratched off the list, as I thought them unnecessary and expensive. No doubt about it, they are expensive, but as I did more reading, research, and observation of my own daughter, I changed my mind.

You see, individually she may be able to do them quickly and easily, but as she becomes skilled at performing this exercise, I will allow her to do two simultaneously, then three, then four. These are the extensions for learning to used the Knobbed Cylinders visually.

Then I will introduce the Knobbed Cylinders as a tactile activity. Essentially you start from the beginning, using one block at a time, but this time round, you wear a blindfold. Believe me, it isn't easy! I've done all four together as a visual activity, and that was difficult enough. Sometime soon I'm hoping to try it blindfolded.

By the time you've gone through all these activities, your child will probably be well into elementary school!

Oh, and after that there are things you can do with the Knobbed Cylinders and the Knobless Cylinders. I don't know yet what those things are, but when I find out, you'll find out too!

Dimensions of the Knobbed and Knobless Cylinders and Blocks
As for the size of the cylinders and the cylinder blocks, as you can see, their size is substantial:


The blocks themselves are 45 3/4 cm long and 7 1/2 cm wide. The cylinders are identical in size to the knobless cylinders with the exception of the knobs themselves. Their dimensions are as follows:

Block #1 - Cylinders begin with the largest being 5 cm in diameter and 5cm in height. Each subsequent cylinder decreases both in diameter and in height by 0.5 cm. The smallest cylinder is 1 cm in diameter and 1 cm in height.

Block #2 - Cylinders begin with the largest being 5 cm in diameter and 1 cm in height. Each subsequent cylinder decreases in diameter by 0.5 cm and increases in height by 0.5 cm. The smallest cylinder is 1 cm in diameter and 5 cm in height.

Block #3 - Cylinders begin with the largest being 5 cm in diameter and 5 cm in height. Each subsequent cylinder decreases in diameter by 0.5 cm, but the height of all the cylinders is identical. The smallest cylinder is 1 cm in diameter and 5 cm in height.

Block #4 - Cylinders begin with the largest being 2.5 cm in diameter and 5 cm in height. Each subsequent cylinder decreases in height by 0.5 cm, but the diameter of all the cylinders is identical. The smallest cylinder is 2.5 cm in diameter and 1 cm in height.

How to Present the Knobbed Cylinders/Cylinder Blocks
The initial presentation of the knobbed cylinders is fairly simple. The child is asked to accompany the teacher as she shows her something new. The teacher grasps the cylinder block with both hands on either end and carries it carefully to the desk or table. Then the teacher seats herself and begins to take out each cylinder, using the thumb, index finger, and middle finger of her dominant hand. As she removes the cylinders, she places them on the far side of the block in a random fashion.

When all the cylinders have been removed, the teacher begin to replace the cylinders in order, either beginning from the smallest or the largest. The teacher is not to touch the cylinder itself, but rather holds it by the knob, so that she is visually discriminating the size of the cylinder and the hole.

If the student wishes to try replacing the cylinders, then the teacher should step back and allow her to carry on the activity alone while she observes. If the student resorts to touching the cylinders or the holes, or is noisy when performing the activity, the teacher should make note of it, and during the following class time re-present the material noting aloud, "See how I hold the cylinder by the knob, using my thumb and two fingers? That way it's my eyes that are figuring out where they should go!" or "Listen closely as I put the cylinder in. I can do it very quietly! When you replace the cylinders, see if you can do it quietly too!"

Should the student be overly rough, simply take the block away noting that the materials are very special and if we want to be allowed to use them, we need to use them with care so they don't get hurt.

Here Ella is shown using the second cylinder block. The first and second are often offered within a day or two of each other as both sets vary both in diameter and in height, making them the two easiest to master. The next step would either be to present the third block or to teach the child how to use two blocks at once, which is done by placing the blocks in a "V," removing the cylinders as before, mixing the two sets together in the middle of the "V," and then trying to replace them in the correct blocks.

Where to Get Cylinder Blocks
The cylinder blocks were my third order from i-Fit Wooden Toy Supplier (aka Montessori Equipment) which has some of the least expensive Montessori materials I've ever found. Added to that is the fact that I've had excellent service from them. When I placed my order, they had run out of the Economy Cylinder Blocks, so they sent me the Premium Cylinder Blocks instead. Upon arrival, I was very impressed at their beauty. During shipping, however, one of the knobs had been knocked off its cylinder. That was easily fixed with a little carpenter's glue. When I e-mailed the company saying how pleased I was, I happened to mention the slight breakage. Their response was swift: that if it happened again, to let them know immediately and they would send a replacement knobbed cylinder. Needless to say, next time I want to buy Montessori materials rather than make them, I will be ordering from them again.

A Bit on the Funny Side If you look closely at the above picture, not only should you notice that Ella is not holding the cylinder correctly, but that she has it leaning toward another cylinder. The reason is that my daughter is very imaginative. Where others see knobbed cylinders, she sees a variety of interesting people, ranging (in this case) from short and fat to tall and skinny! Here two of the people are talking to one another! Ella's tendency is to anthropomorphise everything! Between that, and her dozens of imaginary friends, our schoolroom can get a bit crowded!

A while back, I promised to do a post on teaching the imaginative child: getting them to control their imagination during school time without stifling it completely. I haven't forgotten that, but as yet I haven't got around to it! As you can see, though, it is something I have to deal with on a frequent basis and much of the time I feel like I'm walking a fine line between crushing her imagination and encouraging her fun and fantastical world! And, as I said before, I will be posting more on that interesting balance later.

Ultimately, she does get the "work" done. And the wonderful part is, for the Montessori student most of their school "work" feels more like school "play," which is as it should be. My final goal is not merely to educate my daughter, but to plant within her a love of learning that will continue throughout her life. After all, if you love learning, then it isn't really "work," is it?

Labels: , , , , , ,